
Table of Contents
ToggleTaper cutting by hand on a table saw is risky, your fingers drift, the blade pulls the wood, and suddenly you’ve got a mangled piece and an adrenaline spike. A table saw taper jig eliminates that danger while delivering clean, repeatable cuts every time. Whether you’re tapering furniture legs, cutting wedges, or shaping angled edges, a homemade tapering jig for your table saw is one of the most practical workshop additions you’ll make. This guide walks you through building one from basic materials and using it safely to create professional-quality tapers without the white knuckles.
Key Takeaways
- A table saw taper jig safely eliminates hand-feed risks by holding your workpiece at a fixed angle, delivering clean and repeatable cuts every time.
- Build a functional taper jig from basic materials—a 1×4 board, carriage bolt, and pivot block—for under $30 in about an hour.
- Secure your workpiece with clamps, test-cut on scrap wood at a conservative angle (10–15 degrees), then dial in the angle before making final cuts.
- Mark angle guides directly on your table saw table using a protractor or tape reference angles to ensure consistent taper cuts across multiple pieces.
- Always wear eye and hearing protection, keep hands well behind the workpiece, and stop immediately if binding or stalling occurs—then turn off the saw before touching anything.
What Is a Table Saw Taper Jig and Why You Need One
A taper jig is a simple wooden guide that holds your workpiece at a fixed angle while the blade cuts it. Instead of fighting to keep a narrowing piece steady as it passes the blade, the jig does the work for you. The wood stays secure, your hands stay far from danger, and the cut stays straight and consistent.
Why does this matter? Taper cuts show up everywhere in woodworking: furniture legs that get thinner toward the bottom, decorative wedges, angled shims, or even architectural millwork. Freehand tapering on a table saw is genuinely dangerous. The wood can bind, twist, or get yanked toward the blade. A taper jig for table saw work transforms that risky operation into something controlled and repeatable. You’ll also find a taper jig valuable if you’re making multiple identical pieces, dial in the angle once, and every cut matches.
Materials and Tools Required for Building Your Own Taper Jig
You don’t need exotic materials. A quality taper jig for table saw use starts with:
Materials:
- One 1×4 or 1×6 board (approximately 18–24 inches long: use straight, flat stock with no warping)
- One ⅜-inch carriage bolt (3–4 inches long) with matching washer and wing nut
- One hardwood or plywood offcut for the pivot block (roughly 2×4 inches)
- Wood screws (1½-inch, coarse-thread) and nails (2-inch finish nails)
- Wood glue and sandpaper (80- and 150-grit)
Tools:
- Miter saw or circular saw
- Drill with bits (including one matching your carriage bolt diameter)
- Tape measure and pencil
- Clamps (at least two)
- Square (framing or combination square)
- Safety gear: eye protection, hearing protection, and dust mask
You can find most of these at any home center. Total material cost typically runs $15–$30, depending on what you already have in the shop.
Step-by-Step Instructions to Build a Taper Jig
Preparing Your Wood and Base Components
Start with a straight, flat piece of 1×4 or 1×6 lumber, cut to approximately 20 inches long. This becomes your base platform. Sand both faces lightly with 150-grit sandpaper to remove any mill dust or rough spots.
Measure and mark a line across the bottom face, about 3 inches from one end. Drill a hole through this mark using a bit that matches your carriage bolt diameter (typically ⅜ inch). Drill straight through: any angle here will throw off your taper angle.
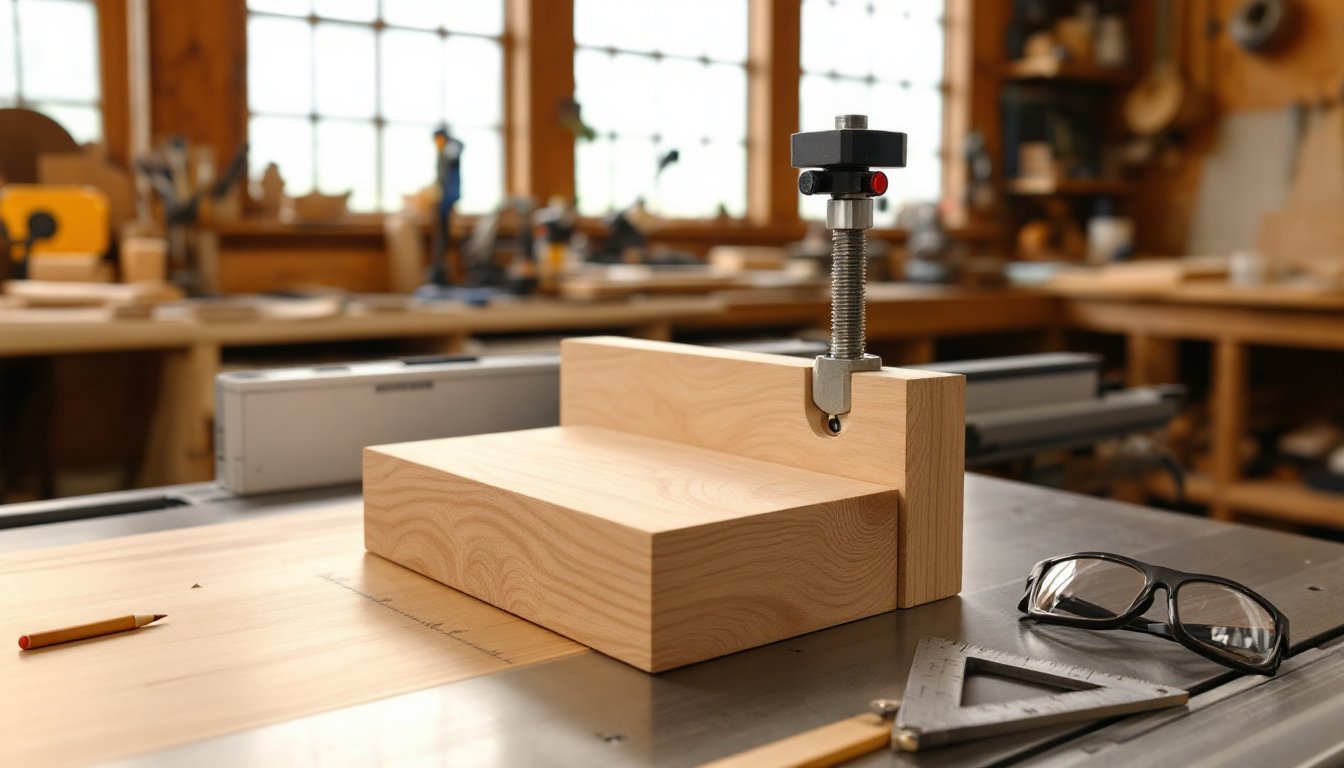
Cut or select a hardwood block about 2×4 inches and ¾ inch thick. This pivot block will sit under the base and allow the jig to rotate. Shape the pivot block so one edge is rounded or slightly tapered, this edge sits on the table saw top and acts as your pivot point. Secure this block to the underside of your base platform using wood glue and two 1½-inch screws drilled from the top. The pivot block should be positioned directly under your drilled hole, so when you tighten the carriage bolt, it locks the jig at your desired angle.
Assembly and Securing the Adjustable Pivot Point
Insert the carriage bolt through the hole you drilled in the base, with the bolt head underneath. Slide a washer onto the bolt above the base, then thread the wing nut on hand-tight, don’t crank it yet.
The jig works by pivoting the base around the bolt point. By loosening the wing nut and rotating the base, you change the cutting angle. Mark angle guides on the table saw table itself using a protractor or angle gauge, or tape reference angles to the table edge (common angles: 10°, 15°, 20°, 25°).
Test-fit the jig on your table saw. The base should sit flat, and the pivot block underneath should contact the table. Tighten the wing nut snugly, firm enough that the jig doesn’t shift during a cut, but loose enough that you can adjust it by hand if needed. Sand any rough edges, and your taper jig is ready.
How to Use Your Taper Jig Safely and Effectively
Before every cut, wear eye protection and hearing protection. Dust from rip cuts can be aggressive, so consider a dust mask too. Set your blade height so it’s about ¼ inch taller than your workpiece, never higher.
Secure your workpiece to the jig using two clamps, one near each end. Position the piece so its edge to be tapered points toward the blade, not away. Mark a reference line on the workpiece showing the taper profile: this helps you see if the blade is tracking correctly before you commit the whole piece.
Start with the jig’s angle set conservatively, say, 10–15 degrees, and make a test cut on scrap wood matching your workpiece thickness and width. Check the angle with a protractor or against a sample piece. Adjust the wing nut, pivot the jig slightly if needed, and try again. Once the angle is dialed in, make your actual cuts. Feed the jig steadily toward the blade, keeping your hands well behind the workpiece. Let the blade do the work: don’t force the jig forward.
For multiple identical tapers, leave the jig locked at that angle. Unclamp the finished piece, position the next workpiece, tighten the clamps, and feed it through. Instructables and other maker communities host detailed project galleries showing varied jig designs and angle settings for specific furniture styles if you want to explore options.
Never reach toward the blade while the saw is running, and always turn off the saw before unclamping a piece. If the workpiece binds or the blade stalls, stop immediately, turn off the saw, and wait for the blade to stop completely before touching anything.
Conclusion
A homemade table saw taper jig takes an hour to build and solves a real safety problem while opening up new joinery and design possibilities. Once you’ve built one, you’ll wonder how you ever managed without it. Store it near your table saw, and it becomes a go-to tool for legs, wedges, and custom-angled cuts. Your future projects will thank you for the precision, and your hands will thank you for the safety.